February 28, 2010

New to YOU!


There is a new contest this week over at Let's Scrap. This time the challenge is to try a technique that YOU have never tried before. It can be super simple, just as long as it is something that you have never done before. Here is my example:

 
I created a very simple layout using one of Cheri's sketches so I could showcase the techniques that are new to me.
I laced ribbon through my punched border:
  
This took a bit of time and I had to be careful about getting the ribbon twisted but I love how it looks.
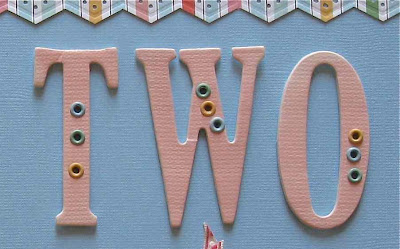
Then I tried using some of those ten million eyelets I have in my stash to dress up some plain chipboard letters:
 
 So come on over to Let's Scrap and join in on the challenge this week. Up for grabs is a RAK of Rusty Pickle goodies from my stash!


AND!

 
Okay, how saweet is this!!! Julie Bonner, yes, THE JULIE BONNER, sent me this lovely blog award. Thanks Julie!!!

Please allow me to pass it on to three of my favorite blogs:


February 26, 2010

Many Thanks to Scrapbook.com!


Today is my ONE YEAR Anniversary over at Scrapbook.com.

This was the very first online community that I joined and I am so glad that I did...and for so many reasons. I began my time at SB.com looking at all the amazing scraprooms and using some of the great ideas that I found there.

I was still happily scrapping the CM way and then I started to look at the SB.com gallery. WOWsers!

In May of 2009, I attended CKU, Creating Keepsakes University. THAT was THE turning point. I began to shed the CM way and branch out into all the fabulous new techniques and products available from all the amazing scrapbooking companies {that I'd never even heard of a year ago}.

They also have challenges and contests over at SB.com. The first one I joined was the 2009 Album Contest.  The prize was a ONE HUNDRED DOLLAR gift certificate to the store! That seemed worth the time and effort to create and upload 50 new layouts!!!  A few weeks ago, I got the word. I WON!!!!! The timing was impeccable. It was right after the HVACatastrophe aka, halt on all unnecessary spending. I held on to my gift certificate until the CHA releases that I "had to have" were in stock. Then I hit the order button. A few days later, the UPS guy showed up with my haul.


Just look at all this goodness:

2 complete lines from Cosmo Cricket, assorted Jenni Bowlin including the new banner stickers, Dear Lizzy, Graphic 45, Pink Paislee, KaiserCraft...

What a dream come true. Thanks Kels and the rest of the team at Scrapbook.com. You can bet I have my 2010 album started!

February 23, 2010

Tuesday's Tips & Techniques-Quick Tip: Scraps & Punches


Here is some more DT work for Let's Scrap. This is my oldest dd getting her very first salon cut with our hairdresser, Megan. My favorite part of this layout is the lock of hair nestled inside that clear envelope. I wanted to include scissors on the page too but I didn't have any in my stash so I improvised with a couple Maya Road pins and a piece of floss. Oh, and see those tabs...well I really wanted to use a scrap of yellow that I had in my scrap folder but the piece was just a bit smaller than my file tab punch. I looked through my scrap folder for some more but nothing matched the AC paper buttons quite like this little scrap:
  
Then it dawned on me...would I even need a whole piece of the punch?
  
Perhaps this much would be okay since I was going to fold it in half anyway...
  
So I punched it out
  
And yes, it worked just fine!
  
My layout is based on another one of Cheri's amazing sketches over at Let's Scrap

Isn't the sketch just beautiful?


Happy Scapping!

February 22, 2010

BINGO!


Here is my entry for Sally's challenge over at Let's Scrap! I went across the first row (Pink, Hearts, Black, Bling). I thought about going for a black out  but once I got to this spot on the layout I just decided...DONE!
  
I used lots of die cut hearts that I made with my Sizzix, punched some more hearts with my CM heart punch and my MS heart punch. I also used a few transparencies...something I don't do too often but I thought they added a perfect splash of red. 
  
I also used quite a few pop dots to give dimension to my "wreath of hearts." So, come on over and play along -you've got until Friday! 


February 21, 2010

Love Bingo Challenge & Card Sketch


Each Friday over at Let's Scrap a different design team member issues a weekly challenge. This week is Sally's turn! She is super creative and sweet as can be. Her challenge is to create a layout that includes (but is NOT limited to) a bingo from this card:

L
O
V
E
The color pink
Hearts
The color black
bling
Flowers
Journaling List of What I love…
stamped image
handmade embellishment
Use glitter or glimmer mist
the color red
lace/velvet
Use "happy" in your title
Use "Love" in your title
stitch on layout
arrow
the color brown

You can go down, across or sideways! Come on over to play! You can also visit Sally's blog to see lots of her incredible creations!

Also at Let's Scrap we have a card sketch this week! Here is my take on Kimmy's sketch:
 
And here is the sketch: 
As you can see, I flipped it! I used pearls for my corners, the negative edge of a punch for my bottom strip, some pretty fiber trim and a Webster's Pages fabric element. Hope to see you over at Let's Scrap soon!

February 16, 2010

Tuesday's Tips & Techniques: Twisted Fabric Flowers {Part 2}


Today I am going to show you a couple things. First, I will show you how to use printed fabrics to make the twisted fabric flowers and then I will show you LOTS of ideas for embellishing them!


I was making a bunch this time so I used my glue gun instead of my daughter and I set up in the kitchen with my craft mat. I also used a variety of backing materials from felt to punch packaging and even some scraps of cardstock. {Yay for scraps!}
  
The technique is much the same. I did tie a knot at the end of my fabric this time. This is easier when you are working with hot glue but it does make for a hard center, which in turn makes it somewhat more difficult to attach embellishments to the center of the finished flower. ~Tradeoffs~ 
Of course, I guess you could just leave a flower with a naked knotted center!

  
Begin by placing a spot of hot glue in the center of your circle, then press on the knotted end of your fabric.
  
When working with printed fabric I simply pull the fabric out toward me and then roll the edges under. {I didn't iron it because I wanted the fluffy rounded edges in my finished flower as opposed to iron creases.} Then I just twist the fabric and start going round and round with both the fabric and the hot glue.
  
This is the same wrap, turn and stick technique that we used before. Just keep rolling the fabric before twisting so that the pretty side shows. 


I like to vary how tightly I twist the fabric. This actually can make a HUGE difference in how the finished flower turns out. This one shows a much looser twist. 
{I see I need to trim my backing on this one...}

Okay, on to EMBELLISHING! 
These flowers are so much fun to embellish! I use lots and lots of different items for the centers. Here is a vintage piece of jewelry. This clip-on earring belonged to my grandmother. Isn't it beautiful!!!
 This is a charm that I picked up at a craft store. Looks vintage but was less than $1.00!
Buttons look great, especially on the muslin flowers.
  
Here I used a glittery chipboard letter tied with a piece of floss.
  
~This is a monogrammed brad~ 
  
Here is one with a little more whimsy -a gingham bow with an epoxy covered faux-button. 
  
I also wanted to try some seed beads in the centers of my flowers. I found that a medium glue dot worked well since I could manipulate my beads after placing them on the flower.
  
Look close, you may have to click on this picture but there is a glue dot in the center of that flower.
  
  
I love the way these bead centers came out. They look so much better IRL!

 You knew this stuff was coming!
Glimmer Mist!!!
Enough said. 
  
I tried to match her dress...didn't quite make it but close enough!!!

  
This flower is so tiny and the seed beads are so tiny...tweezers are very handy!!! 
  
And finally, Stickles. And more seed beads.
  
It almost looks like a tiny piece of jewelry. 


Well, there you have it. I hope this inspires many of you to try making {and embellishing} these fun little flowers. I have so enjoyed all your comments on my first TFF tutorial and would LOVE to see what you come up with. Leave me a link if you'd like to share.


February 15, 2010

Love Struck!


I just love this line from Making Memories. I have made layouts, cards, wall hangings and even an altered photo holder! Just thought I'd share a few of my favorites with you:
 
This is one of my easel cards {LOVE making these} and the photo holder that I used my card scraps to make. Who knew you could actually accumulate scraps from card making!
 
  
 I gave this to Jason for his desk at work. Heehee, won't it be cute with all the hearts and pink! I notice that it didn't head in to the office with him today...
  
It has been so cold and snowy here that I gave the teachers hot chocolate in a pouch for Valentine's Day this year! 
  
I cannot get enough of these easel cards!!! They are so simple to construct yet they look so complicated. I first saw them on someone's SU site but since then I see the all over the place. 


 And here is my five minute card. Maybe not even 5!

 And one more look at the wall hanging I showed you last week:
Layouts will have to wait, they are all DT work that I can't release yet! 

~See you tomorrow with Part Two of my Twisted Flower Tutorial~

Related Posts with Thumbnails