Thanksgiving? Next week? I'm not sure if it was the odd weather we had this summer or the trees changing colors so late this year but I am feeling really...well, like the "baby" looked on her 2 year old photo shoot yesterday:
I have done NOTHING to prepare. No menu, no shopping. But like Scarlett says, "I'll think about that tomorrow." Except I really mean it. Thank goodness for scrapbook pages of holiday tables and that scrappy recipe book in my kitchen. And thanks, especially, for my mom, who still manages to do half the work for the Thanksgiving meal. At least I know we will have the turkey defrosted (I loathe that process) and mashed potatoes at the table.
So tomorrow not only am I gonna have to plan and shop for Thanksgiving, I might even try to squeeze in photo shoot #2 since my subject was more interested in blowing the "wishers" than posing for portraits...
And then she just up and ran off. I let my photo assistant catch her for me.
However, all was not lost. I did manage to catch this sweet look right after we got back from ice skating lessons for my homeschooler.
I'm pretty happy with this one...Love her smile and the fact that we just popped out of the van, onto the front lawn and captured this with one snap of the camera. ONE. I'm trying to give myself a break...at least I am finally shooting in full manual.
*************************************
Cricut Iron-Ons. From Fabric. So EASY. So fun and so FAST!
I wanted to hide this cluttered look.
So a few months ago I made a cover for my sewing machine from canvas and scraps of fabric along with some Jenni Bowlin buttons. I had always planned on decorating the middle but I'm just now getting around to actually doing it.
I decided to add a simple heart to the middle since I am after all trying to avoid the clutter...
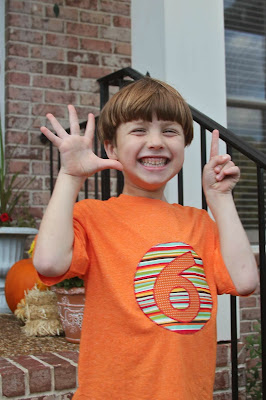
I have used my Cricut to make several iron-ons now and so far, so AWESOME. No mistakes, no waste, only success! My favorite project so far has been my "baby" boy's 6 shirt.
To make my iron-ons with the Cricut, I use Pellon Heavy-Duty Wonder-Under.
It is sold from a bolt at your fabric store.
I cut my Wonder-Under to the same size as the fabric. It's sticky once ironed so it's best to keep them close to the same size. I don't go all the way to cutting them together exactly as I have a special piece of broadcloth that I use to protect my iron but I get it as close as I can with the little patience that I do have;).
It helps that I have a handy, dandy measuring cover on my ironing board.
I place my Wonder-Under backed fabric on a clean STICKY mat and press with a brayer. I put my fabric on paper side down. You will see why later;). Oh, and set your blade depth to 6.
Speaking of blades, I use a very sharp blade reserved for cutting fabric only.
Once cut, the fabric peels right off, leaving the paper on the sticky mat! Yay, saves the annoying step of peeling that paper off of the fabric.
Just your cut is left...
And it comes right off, easy peasy.
Now, I have heard that some people like to reverse the image in CCR and place the fabric paper side up. I have never tried this but I imagine that might be the way to go if your cut is more intricate. But I just can't give up the way the mat peels the paper off for me. I am so prone to those little paper cuts under my nails from peeling backings off...
Now, I have heard that some people like to reverse the image in CCR and place the fabric paper side up. I have never tried this but I imagine that might be the way to go if your cut is more intricate. But I just can't give up the way the mat peels the paper off for me. I am so prone to those little paper cuts under my nails from peeling backings off...
Moving on. Before I iron my cut onto my project I always tape my cut in place, to make sure I know just where I want it permanently. Washi tape is perfect for this.
Then I check the Pellon directions once more...15 seconds or 7 seconds, I always forget which time goes where.
And done. Well, maybe. I love the look of stitching. Everywhere. Just about all of my cards and scrapbook layouts have some sort of stitching so I went around the heart with a simple zig-zag stitch. I kept it pretty loose as I really wanted to outline the heart in green but none of my thread matched. So I used pink and I'll see if it grows on me. If it doesn't, I'll be able to rip it out and redo it in green.
So there you have it. Simple. This project took me 15 minutes. Start to finish. Yes, really. If I hadn't had to reload my bobbin, it would have be 13 minutes! I hope you give it a shot. If you do, leave a comment and link to your project, I'd love to see it!


